Lie on your back, knees bent, feet hip-width apart near your glutes. Push through your heels, squeeze hard, and lift your hips until your body forms a straight line—shoulders to knees. Hold two seconds at the top, then lower slowly. That’s it. Most people either arch their lower back (mistake!) or let hamstrings dominate instead of glutes. Master the bodyweight version first, keep your core braced, and you’ll tap into serious hip strength, better posture, and the foundation for heavier progressions.
Key Takeaways
- Lie on your back with knees bent, feet hip-width apart 6–8 inches from glutes, and push through heels to lift hips.
- Hold the top position for 2 seconds with hips level, squeezing glutes hard while maintaining a neutral spine without arching.
- Keep feet positioned close to glutes to maximize glute activation and avoid shifting work to hamstrings or lower back.
- Progress from bodyweight bridges to loaded variations using dumbbells, sandbags, or barbells once you master proper form without lower-back arch.
- Glute bridges build hip-extension strength for squats and deadlifts, improve core stability, reduce lower-back pain, and enhance athletic performance.
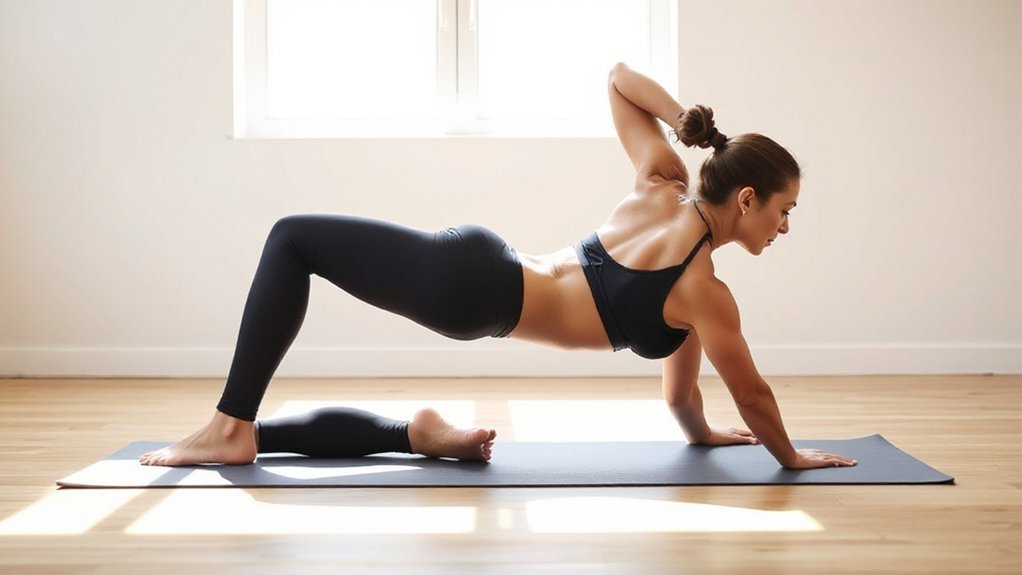
How to Perform a Glute Bridge in 5 Steps
Five straightforward steps—that’s all you need to master this powerhouse move.
Five straightforward steps—that’s all you need to master this powerhouse glute-building move.
Step 1: Get positioned. Lie on your back, knees bent, feet hip-width apart about 6–8 inches from your glutes. Toes point forward, arms rest by your sides. Gently brace your abs to flatten your low back against the floor.
Step 2: Drive up. Exhale and push through your heels while squeezing your glutes hard. Keep that abdominal tension locked in—it’s your anchor.
Step 3: Reach the top. Your body should form one straight line from shoulders to knees. No sagging hips, no arching your lower back. Core stays engaged.
Step 4: Hold and squeeze. Pause here for two solid seconds, maximizing that glute activation. Feel the burn—that’s progress.
Step 5: Lower down. Inhale and slowly reverse, maintaining tension throughout. Control matters more than speed here.
Common Glute Bridge Mistakes That Limit Results

Even though you’re nailing the five-step formula, a few sneaky positioning and timing habits can tank your results—and you probably don’t even realize you’re doing them.
Here’s the thing: your feet placement matters. Push them too far from your glutes instead of keeping them 6–8 inches away, and you’ve just handed the work to your hamstrings. Game over for that glute burn you’re chasing.
Then there’s your spine. Arching your lower back at the top feels powerful, sure, but it actually limits real glute recruitment and invites injury. Keep it neutral, brace that core, and you’ll feel the difference immediately.
Don’t rush your reps either. A 2-second squeeze at the top—really *squeeze*—builds strength and size. Quick, sloppy reps? They’re stealing your gains. Finally, skip the excessive hip height. You’re not reaching for the ceiling. Control the lift, maintain tension, and watch results follow.
Glute Bridge Muscles and Why Form Matters
Your glute bridge’s effectiveness lives or dies by which muscles you’re actually firing up—and honestly, most people get this wrong. You’re not just moving weight; you’re teaching your body where to find strength. When form breaks down, your glutes check out and your lower back becomes the unwilling hero—which isn’t heroic, it’s just painful.
| Muscle | Role | What You Feel | Common Mistake |
|---|---|---|---|
| Gluteus Maximus | Primary hip extensor | Burning in your glute cheeks | Overarching your back instead |
| Hamstrings | Secondary helper | Slight tension behind thighs | Feet too far back, stealing glute work |
| Transverse Abdominis | Stabilizer | Gentle core tension | Letting your belly sag, losing pelvic control |
| Gluteus Medius | Side glute activator | Outer hip engagement | Missing this entirely without a mini band |
Proper form keeps tension exactly where it belongs: your glutes. That’s how you build real strength.
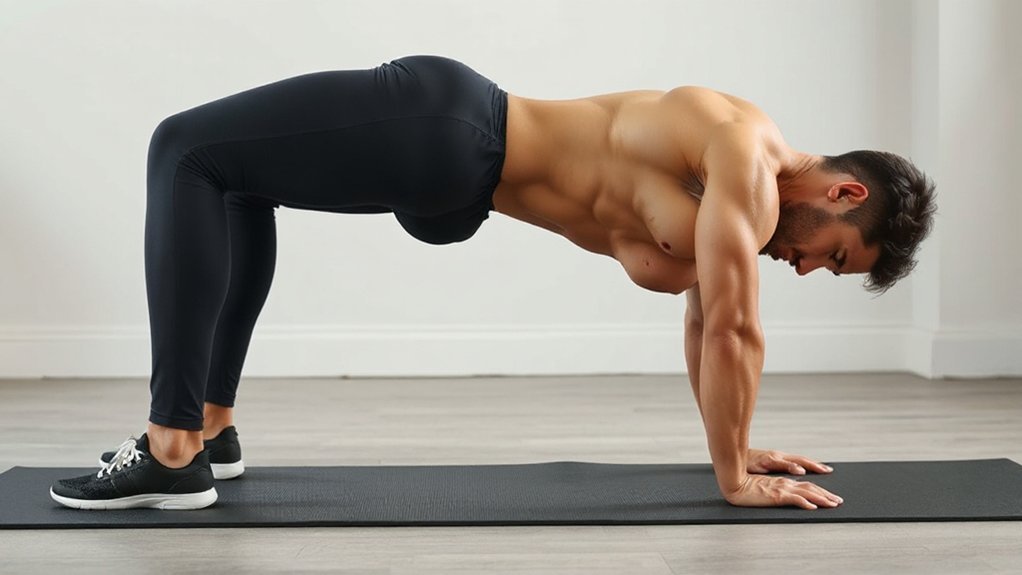
When You’re Ready to Progress: Bodyweight to Weighted Variations
Once you’ve nailed the bodyweight bridge—hips driven purely by glutes, zero low-back arch, a solid 2-second squeeze at the top—you’re ready to add load.
Start simple: grab a single dumbbell or sandbag and rest it across your hips. Pad underneath prevents discomfort and rolling. Hold the weight steady, keep your pelvis tucked, and brace your abs hard throughout. This isn’t optional—it protects your lower back from dangerous overextension.
Here’s the progression rule: add weight only when you crush at least two extra reps across two sets with flawless technique. No shortcuts, no sloppy form chasing bigger numbers.
Want stability or single-leg strength? Progress to single-leg bridges before loading. Eventually, once you’re handling roughly 20 kg or more, shift toward barbell bridges or hip thrusts—they’re built for serious weight.
Keep your feet positioned right. Move them too far back and you’ll shift the work to your hamstrings. That’s not your goal here.
Strength, Posture, and Athletic Performance Benefits
Because the glute bridge targets the gluteus maximus—literally one of your body’s biggest, strongest muscles—consistent progressive work here pays dividends across almost every athletic movement you care about. You’re building hip-extension power that directly strengthens your squats, deadlifts, and sprinting. Better posture? You’ve got it. Your core stays locked through transverse abdominis engagement, reducing lumbar strain and low-back pain when you nail the form.
| Benefit | What You Gain |
|---|---|
| Hip-Extension Strength | Carryover to squats, deadlifts, sprints |
| Core Stability | Reduced lower-back pain, better pelvic control |
| Glute Hypertrophy | Greater muscle activation than traditional deadlifts |
| Frontal-Plane Stability | Mini-band bridges prevent knee valgus collapse |
| Athletic Power | Efficient strength-building for explosive movements |
Add mini-bands above your knees, and you’re boosting gluteus medius activation for frontal-plane hip stability—that’s injury prevention working quietly in the background. You’re not just exercising; you’re building yourself stronger, more resilient.
Frequently Asked Questions
What Is a Glute Bridge Good For?
Glute bridges wake up your glutes and strengthen your hips—seriously, they’re game-changers. You’ll notice better squat and deadlift form almost immediately. They stabilize your lower back, protecting you from pain caused by weak glutes and poor posture. Plus, you can do them daily as a warm-up or scale them with weight for strength gains. Simple, effective, adaptable—that’s your bridge.
What Will Happen if I Do Glute Bridges Everyday?
You’ll strengthen your glutes fast—especially if you keep it light. Daily activation (1–3 sets, bodyweight) primes your muscles, improves posture, and reduces back pain. But here’s the catch: heavy, loaded bridges every day? You’ll risk overuse, soreness, and actually plateau your strength gains. Your muscles need recovery. Mix it up—add bands, try single-leg variations, hold longer. Keep intensity reasonable, and you’ll build solid glute endurance without burning out.
How to Properly Do Glute Bridge?
You’ll want to lie flat, knees bent, feet hip-width apart about six to eight inches from your butt. Brace your core, then exhale and push through your heels, driving those hips up until you’re straight from shoulders to knees. Squeeze hard at the top for two seconds, then lower slowly. That’s it—controlled, intentional, no lower-back arching. Master bodyweight first before adding weight.
What Will 100 Glute Bridges a Day Do?
You’ll boost glute activation and muscular endurance—that’s the honest truth. But here’s what won’t happen: meaningful muscle growth or strength gains without progressive overload. Your bodyweight alone leans toward conditioning, not hypertrophy. You’ll notice improved activation, better hip stability, maybe enhanced glute “feel.” For actual size? You’ll need to add weight—dumbbells, resistance bands—once form stays solid. Daily bridges work great as warm-ups, though.
So
You’ve now got the blueprint—master the basics, fix your form, and you’re golden. Here’s the thing: you’ll probably notice better posture before you notice stronger glutes, which’s funny because they’re connected. Start bodyweight, progress when you’re ready, and remember, consistency beats perfection every time. You’ve got this. Your hips’ll thank you, your back’ll feel better, and yeah, you’ll look stronger too.


Leave a Comment